privileged
제한 없음.
Pod을 어느 노드에 놓을 것인가
spec.nodeName이 비어 있는 Pod을 발견한다
Filtering — 놓을 수 없는 노드를 전부 거른다
Scoring — 남은 노드에 점수를 매긴다
최고점 노드로 binding — spec.nodeName을 채운다
Filtering에서 걸러지는 이유들
hostPort — Pod이 노드의 포트를 직접 점유하는 설정. 드물게 쓴다), 볼륨의 노드 제약(topology)Pending의 원인은 대부분 이 목록 안에 있다.
그리고 describe pod의 Events가 어느 항목에서 걸렸는지 문장으로 알려준다.
기본 스케줄러는 리소스 여유와 균형만 본다 — 어떤 Pod이 어떤 노드에 가야 하는지의 사정(GPU 노드, 전용 노드, 존 분산 같은 요구)은 모른다. 그 사정을 spec에 적어 Filtering·Scoring에 반영시키는 것이 이 절의 도구들이다.
방향이 반대인 두 축이 핵심이다.
| 도구 | 관점 | 성격 |
|---|---|---|
nodeName | Pod → 특정 노드 | 스케줄러를 건너뛴다 |
nodeSelector | Pod → 노드 라벨 | 단순, 강제 |
| nodeAffinity | Pod → 노드 라벨 | 표현력 있음, 강제/선호 선택 가능 |
| podAffinity / podAntiAffinity | Pod → 다른 Pod | 함께 / 떨어뜨려 놓기 |
| taints / tolerations | 노드 → Pod | 노드가 밀어낸다 |
| topologySpreadConstraints | Pod → 분산 | 균등 분포 |
affinity는 Pod이 노드를 고르는 것, taint는 노드가 Pod을 거부하는 것. 둘은 함께 쓰여야 완성된다.
spec: nodeName: node01kubectl label node node01 disktype=ssdkubectl get nodes --show-labelskubectl label node node01 disktype- # 삭제spec: nodeSelector: disktype: ssd모든 노드에 자동으로 붙는 라벨도 있다 —
kubernetes.io/hostname, kubernetes.io/os,
topology.kubernetes.io/zone, node-role.kubernetes.io/control-plane.
spec: affinity: nodeAffinity: requiredDuringSchedulingIgnoredDuringExecution: nodeSelectorTerms: - matchExpressions: - key: disktype operator: In values: ["ssd", "nvme"]Filtering 단계에서 작동한다. 조건에 맞는 노드가 하나도 없으면 Pod은 Pending이다.
spec: affinity: nodeAffinity: preferredDuringSchedulingIgnoredDuringExecution: - weight: 50 preference: matchExpressions: - key: topology.kubernetes.io/zone operator: In values: ["ap-northeast-2a"]Scoring 단계에서 작동한다. weight(1~100)로 점수만 준다.
조건에 맞는 노드가 없어도 다른 노드에 배치된다.

requiredDuringScheduling + IgnoredDuringExecution
= “배치할 때는 반드시, 실행 중에는 무시”
| 연산자 | 의미 |
|---|---|
In | 값이 목록 안에 있다 |
NotIn | 목록에 없다 (= 안티 어피니티) |
Exists | 키가 있기만 하면 된다 (values 없음) |
DoesNotExist | 키가 없어야 한다 |
Gt / Lt | 숫자 비교 (nodeAffinity 전용) |
AND / OR 구조
nodeSelectorTerms 의 항목들끼리는 ORmatchExpressions 끼리는 ANDspec: affinity: podAntiAffinity: requiredDuringSchedulingIgnoredDuringExecution: - labelSelector: matchLabels: app: web topologyKey: kubernetes.io/hostname # ← 무엇을 "같은 곳"으로 볼 것인가topologyKey가 무엇을 “같은 곳”으로 볼지 정한다. 이게 핵심이다.
kubernetes.io/hostname → 노드 단위로 (한 노드에 하나씩)topology.kubernetes.io/zone → 가용영역 단위로podAffinity = 조건에 맞는 Pod 곁에, podAntiAffinity = 떨어뜨려podAffinity는 계산 비용이 크다. 대규모 클러스터에서 스케줄링이 느려지는 원인이 되기도 한다.
kubectl taint node node01 key=value:NoSchedulekubectl taint node node01 key=value:NoSchedule- # 제거 (끝에 하이픈)kubectl taint node node01 gpu=true:NoSchedulekubectl describe node node01 | grep -A3 Taintseffect 셋의 차이는 “새 Pod”과 “이미 있는 Pod”을 각각 어떻게 하느냐다.
| effect | 의미 |
|---|---|
NoSchedule | 새 Pod을 배치하지 않는다. 이미 있는 것은 그대로 |
PreferNoSchedule | 되도록 피한다. 자리가 없으면 배치한다 |
NoExecute | 배치도 안 하고, 이미 있는 Pod도 쫓아낸다 |
taint는 노드에 붙이는 조건이고, toleration은 Pod이 그 조건을 견딜 수 있다는 선언이다. toleration이 있다고 그 노드에 가는 것은 아니다 — 갈 수 있게 될 뿐이다.
spec:  tolerations:    - key: "gpu"      operator: "Equal"        # Equal | Exists      value: "true"      effect: "NoSchedule"
    - key: "node.kubernetes.io/not-ready"      operator: "Exists"      effect: "NoExecute"      tolerationSeconds: 300   # 300초까지는 버틴다
    - operator: "Exists"       # key 생략 = 모든 taint를 견딘다
operator: Exists 면 value를 쓰지 않는다effect를 생략하면 모든 effect에 대해 적용된다key까지 생략하고 Exists만 두면 전부 무시 — DaemonSet에서 쓰는 패턴toleration 블록도 필드 이름을 외워 쓰기보다 공식 Taints and Tolerations에서 복사해 key·value·effect만 바꾸는 게 빠르다.
| taint | 언제 |
|---|---|
node.kubernetes.io/not-ready | 노드가 Ready가 아닐 때 (NoExecute) |
node.kubernetes.io/unreachable | 노드와 통신이 안 될 때 (NoExecute) |
node.kubernetes.io/memory-pressure | 메모리 부족 |
node.kubernetes.io/disk-pressure | 디스크 부족 |
node.kubernetes.io/unschedulable | cordon 했을 때 |
node-role.kubernetes.io/control-plane | 컨트롤 플레인 노드 (NoSchedule) |
노드가 죽어도 Pod이 5분 동안 안 옮겨가는 이유가 여기 있다.
not-ready / unreachable에 대한 5분(300초) toleration이 자동으로 붙는다
kubectl cordon node01            # 새 Pod 배치 금지 (기존은 유지)kubectl uncordon node01          # 해제
kubectl drain node01 \  --ignore-daemonsets \          # DaemonSet Pod은 어차피 못 옮기니 무시  --delete-emptydir-data \       # emptyDir을 쓰는 Pod도 지운다  --force                        # 컨트롤러 없는 Pod(단독 Pod)도 지운다
cordon = 노드에 unschedulable 표시 (taint가 붙는다)drain = cordon + 기존 Pod을 전부 축출(evict)podAntiAffinity는 “떨어뜨려라”까지만 말할 수 있다 — “몇 개씩 고르게”는 표현하지 못한다. 그 한계가 위 함정(노드 수보다 많은 replicas가 Pending)으로 나타난다. 균등 분산이 목적이라면 처음부터 이걸 쓴다.
spec: topologySpreadConstraints: - maxSkew: 1 topologyKey: topology.kubernetes.io/zone whenUnsatisfiable: DoNotSchedule # 또는 ScheduleAnyway labelSelector: matchLabels: app: webmaxSkew는 도메인 간 개수 차이의 허용치다.
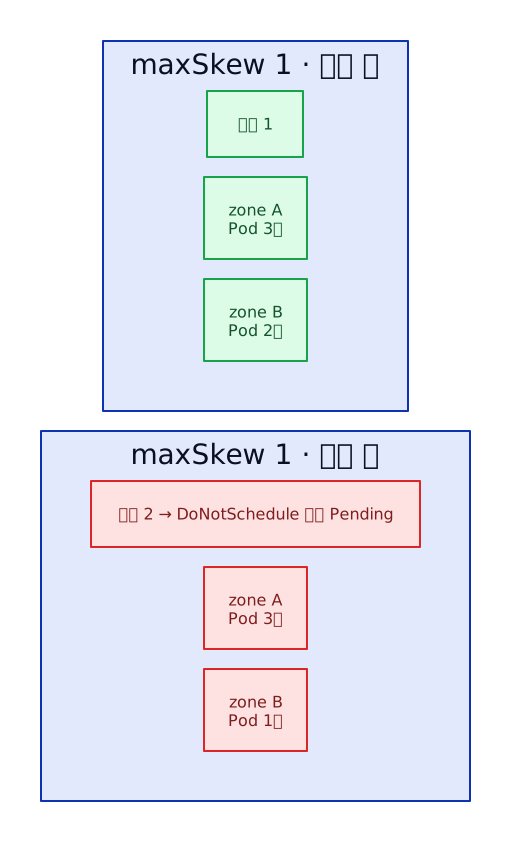
maxSkew: 1 이면 zone A에 3개일 때 zone B는 최소 2개여야 한다whenUnsatisfiable: DoNotSchedule = 강제, ScheduleAnyway = 선호podAntiAffinity보다 표현이 정확하고 계산이 싸다. “노드/존에 고르게 퍼뜨려라”가 목적이라면 이쪽이 정답이다.
우선순위가 없으면 클러스터가 꽉 찼을 때 중요한 Pod도 자리가 날 때까지 똑같이 Pending으로 기다린다. PriorityClass는 “누가 먼저인가”를 선언해 두는 것이고, 자리가 없으면 스케줄러가 덜 중요한 Pod을 쫓아내 자리를 만든다 — 이것이 선점이다.
apiVersion: scheduling.k8s.io/v1kind: PriorityClassmetadata: name: high-priorityvalue: 1000000globalDefault: falsepreemptionPolicy: PreemptLowerPriority # 또는 Neverdescription: "중요한 워크로드용"spec: priorityClassName: high-priority
preemptionPolicy: Never — 우선순위는 높지만 남을 쫓아내지는 않는다system-cluster-critical, system-node-critical축출된 Pod은 describe에 Preempted by ... 로 기록된다.
클래스는 명령 한 줄로도 만든다. 값을 정하기 전에 기존 클래스를 값 순서로 본다.
kubectl get priorityclass --sort-by=.valuekubectl create priorityclass high-priority --value=1000000 --description="중요한 워크로드용"사용자가 만드는 클래스의 값은 10억 이하여야 한다. 그보다 큰 값은 내장 클래스 몫이라
생성이 거부된다(공식 문서).
그래서 “기존 사용자 정의 클래스 중 가장 높은 값”을 찾을 때는 system-으로 시작하는 두 클래스를 뺀다.
기존 값을 기준으로 새 클래스를 만드는 연습은 실전 과제에 있다.
시험 비중 낮음 커스텀 스케줄러를 만드는 법까지 팔
필요는 없다 — schedulerName 필드의 존재와, 아래 함정이 Pending 트러블슈팅에서
쓸모 있다는 것만 챙긴다.
spec: schedulerName: my-schedulerdefault-schedulerkubectl get pods -n kube-system -l component=kube-schedulerkubectl get events | grep -i schedul막는 장치가 없으면 privileged: true나 hostNetwork 같은 위험한 스펙도 아무 검사 없이 통과한다.
이걸 막던 PodSecurityPolicy(PSP)는 v1.25에서 제거되었고 — 옛 자료에 나오면 무시할 것 —
그 빈자리를 메운 것이 Pod Security Admission이다 (커리큘럼의 “Pod admission” 항목).
네임스페이스 라벨로 켠다.
kubectl label ns dev \ pod-security.kubernetes.io/enforce=baseline \ pod-security.kubernetes.io/enforce-version=latest \ pod-security.kubernetes.io/warn=restricted레벨(얼마나 조이나) × 모드(어기면 어떻게 하나)의 조합이다.
privileged
제한 없음.
baseline
알려진 권한 상승을 막는다.
hostNetwork, privileged 등 금지.
restricted
강하게 제한.
runAsNonRoot, capabilities drop ALL 등 요구.
| 모드 | 동작 |
|---|---|
enforce | 거부한다 |
audit | 감사 로그에 남긴다 |
warn | 사용자에게 경고를 보여준다 |
세 모드는 동시에, 서로 다른 레벨로 걸 수 있다. 위 예시가 그렇다 —
enforce=baseline으로 실제 차단은 느슨하게 두고 warn=restricted로 경고만 먼저 띄우면,
기존 워크로드를 깨뜨리지 않고 조이는 방향을 예고할 수 있다. 이것이 실무의 이행 순서다.
이 장에서는 배치 이전의 관문이라는 위치만 잡는다 — 요청이 지나는 admission 파이프라인 전체는 아키텍처, 컨트롤러를 켜고 끄는 방법은 Admission이다.
kubectl get pods -o wide # Pending인 것 확인kubectl describe pod web # ★ Events 를 읽는다kubectl get events --sort-by=.lastTimestampkubectl describe node node01 # Taints / Allocated resourceskubectl get nodes # SchedulingDisabled 표시 확인Events 메시지로 원인이 거의 확정된다.
| 메시지 | 원인 |
|---|---|
Insufficient cpu / Insufficient memory | request 여유 부족 |
node(s) had untolerated taint {...} | toleration 없음 |
node(s) didn't match Pod's node affinity/selector | 라벨 불일치 |
node(s) were unschedulable | cordon 되어 있다 |
pod has unbound immediate PersistentVolumeClaims | PVC가 Bound 안 됨 (PV/PVC 바인딩) |
| (메시지 없음) | 스케줄러가 죽었거나 schedulerName 오타 |
nodeName 채우기)required…IgnoredDuringExecution = “배치할 때만 강제, 실행 중엔 무시”drain은 --ignore-daemonsets 필수, PDB를 존중해 기다린다describe pod의 Events 한 줄로 끝나는 경우가 대부분